Every paddler knows the joy of getting out on the water: freedom, exploration, and adventure. But one challenge remains the same whether you’re a beginner or seasoned kayaker—limited storage space. A kayak offers only so much room, and keeping everything safe, organized, and accessible is essential. That’s where the kayak crate comes in.
A kayak crate is more than a storage box. With a few smart modifications, it becomes the central hub for your gear—turning clutter into efficiency. In this guide from kayakbasics.com, we’ll share the top 10 kayak crate hacks every paddler should know. These hacks will help you maximize space, boost convenience, and make your adventures smoother.
What Is a Kayak Crate?
A kayak crate is a storage solution designed to fit in the tankwell or open storage area of a kayak. It’s most commonly used by anglers, but touring paddlers and recreational kayakers also benefit from having one. Think of it as a portable, customizable storage hub that keeps your gear secure, organized, and easy to access while you’re out on the water.
Kayak crates can be:
- Traditional milk crates repurposed for paddling.
- Soft-sided fabric crates with compartments and straps.
- Hard plastic molded crates built specifically for kayaking, often waterproof and modular.
They’re popular because they make it possible to carry rods, tackle, electronics, snacks, safety items, and even camping gear in a small, organized footprint.
Key Features of a Kayak Crate
1. Compact Size and Fit
- Designed to sit securely in a kayak’s stern tankwell.
- Available in different sizes to fit small recreational kayaks, fishing kayaks, or touring models.
2. Storage Capacity
- Offers internal compartments for tackle boxes, gear, or personal items.
- Many allow modular organization with dividers and trays.
3. Rod Holders
- Essential for kayak fishing.
- Built-in or add-on holders allow you to carry multiple rods hands-free.
4. Durable Construction
- Typically made from high-density plastic, corrosion-resistant metal, or heavy-duty marine fabrics.
- Built to withstand water, sun exposure, and rough handling.
5. Waterproof Options
- Premium crates include sealed lids or waterproof sections for electronics, wallets, or snacks.
6. Attachment Points
- Gear tracks, hooks, and rails allow you to mount extras like cameras, GPS units, cup holders, or lights.
7. Portability
- Handles, backpack straps, or tie-down loops make carrying easy from your vehicle to the water.
8. Customizable Design
- Many crates can be upgraded with accessories such as mesh pockets, drainage systems, and utility trays.
Why Kayak Crates Are Useful
- Organization → Keeps gear separated and easy to access.
- Safety → Prevents loose items from sliding around.
- Efficiency → Saves time by giving everything a dedicated place.
- Adventure Flexibility → Works for fishing, touring, day trips, or multi-day expeditions.
Top 10 Kayak Crate Hacks
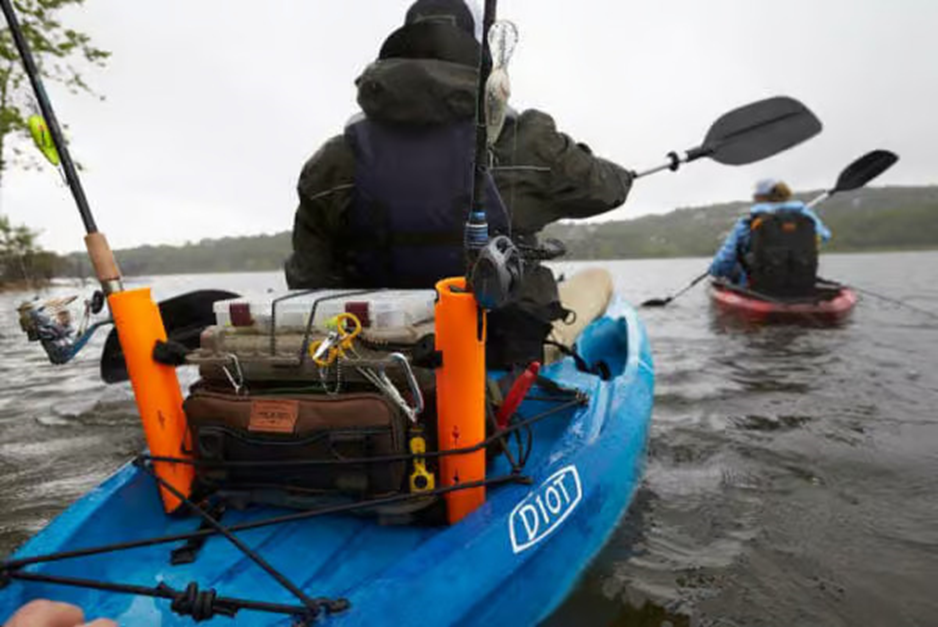
1. Add PVC Rod Holders
Fishing from a kayak is tough without proper rod storage. Attaching PVC pipes to your crate is an inexpensive hack that adds multiple rod holders.
- Cut PVC pipes to 12–16 inches.
- Bolt or zip-tie them vertically to your crate.
- Use them for rods, nets, or even a camera pole.
This keeps rods secure and clears space on your deck.
2. Use Utility Trays for Organization
Digging around in a cluttered crate wastes time. Utility trays or tackle boxes that stack inside your crate allow you to separate hooks, lures, tools, and snacks.
- Sliding trays give easy access.
- Clear lids let you see contents instantly.
- Label trays for faster identification.
The result? A more organized, stress-free paddling experience.
3. Install Mesh Side Pouches
Mesh pouches expand your crate’s storage without adding bulk. They’re perfect for quick-access gear like pliers, sunscreen, or a water bottle.
- Attach with Velcro or zip ties.
- Use marine-grade mesh for durability.
- Keep essentials in reach without opening your crate.
This simple hack maximizes space while keeping your crate lightweight.
4. Mount Accessory Rails
Accessory rails turn your crate into a modular system. With rails, you can attach cup holders, GPS mounts, or GoPro cameras.
- Install rails on the sides or lid.
- Choose aluminum or polymer rails for durability.
- Swap accessories depending on your adventure.
It’s a professional-grade hack that makes your crate as versatile as your kayak.
5. Add a Waterproof Compartment
Electronics and water don’t mix. Protect your valuables by converting part of your crate into a waterproof section.
- Use a dry bag liner inside your crate.
- Add a waterproof box for phones and wallets.
- Consider crates with gasket-sealed lids.
This hack ensures your gear stays dry even in choppy conditions.
6. Use Bungee Cord Systems
A bungee cord system across the top of your crate lets you secure bulky items like jackets, tackle boxes, or a lunch bag.
- Cross bungees in an X-pattern for stronger hold.
- Use adjustable hooks for quick access.
- Combine with straps for heavy gear.
It’s a flexible, low-cost way to add extra storage.
7. Add Lighting for Night Adventures
Paddling or fishing in low light? Install LED strips or clip-on waterproof lights to your crate.
- Use rechargeable LEDs for sustainability.
- Mount them inside for organization or outside for visibility.
- Opt for red lights at night to preserve night vision.
This hack improves safety and convenience for evening trips.
8. Secure Crate with Quick-Release Straps
A poorly secured crate can shift or slide. Upgrade from basic bungees to heavy-duty quick-release straps.
- They keep your crate locked in place.
- Easy release makes unloading faster.
- Adjustable lengths work with any kayak.
This hack ensures stability and saves time at launch.
9. Stack Soft Bags on Top
If you need extra capacity, stack soft dry bags or a cooler on top of your crate.
- Secure with straps or bungees.
- Store clothing, food, or camping supplies.
- Keeps heavier gear low and lighter gear above.
It’s an efficient way to maximize vertical space.
10. Create a DIY Drainage System
Water inside your crate wastes space and damages gear. Drill small holes or add a one-way drainage valve.
- Drainage holes release excess water.
- A valve system prevents backflow.
- Pair with waterproof dividers to keep essentials dry.
This hack ensures your crate stays clean and functional.
Extra Hacks Worth Trying
- Foam padding → Protect delicate gear like cameras.
- Reflective tape → Boost visibility and safety.
- Velcro tool mounts → Keep knives or pliers within easy reach.
- Spray-on waterproof coating → Add durability to soft crates.
Matching Hacks to Your Adventure
- Fishing trips → Prioritize rod holders, waterproof storage, and accessory rails.
- Touring → Focus on dry compartments, lighting, and stacked storage.
- Day paddles → Keep it light with mesh pouches and utility trays.
- Camping expeditions → Combine all hacks for maximum capacity.
Pros and Cons of Modifying Your Kayak Crate
Pros
- Saves space and keeps gear organized.
- Increases safety and convenience.
- Allows full customization for your paddling style.
Cons
- Too many add-ons can increase weight.
- Complex setups may take time to assemble.
- Premium accessories can get expensive.
Maintenance Tips
- Rinse crate and add-ons after saltwater trips.
- Check straps, rails, and pouches for wear.
- Recharge or replace lights before each trip.
- Replace bungees and zip ties annually.
Conclusion
Your kayak crate is more than storage—it’s the heart of your gear system. By using these top 10 kayak crate hacks every paddler should know, you can transform a simple box into an organized, versatile storage hub. From DIY rod holders to waterproof compartments and lighting systems, these hacks make paddling more efficient, safer, and more enjoyable.
Start with one or two hacks, test them on the water, and expand as your needs grow. With the right crate setup, you’ll spend less time fumbling for gear and more time enjoying the adventure.
For more kayaking guides, storage tips, and DIY ideas, visit kayakbasics.com—your trusted resource for paddling success.