
Multiple stock locations in WooCommerce work by creating each warehouse/store as a location, assigning product (and variation) quantities to those locations, then applying routing rules so orders ship from the best source based on stock, zone, or pickup/delivery. Default WooCommerce can handle basic stock control, but true per-location inventory and automated fulfillment usually require a plugin, custom code, or a custom build, depending on how complex your operations are.
If you’re looking for how to set up multiple stock locations for WooCommerce, this guide breaks down each method step-by-step with real routing scenarios, mistakes to avoid, and a launch checklist you can use to confirm everything works before you scale.
Prep Checklist Before You Add Multiple Stock Locations
Multi-location inventory works best when your locations, routing rules, and product data are consistent from day one. Use this checklist to prevent misrouted orders, overselling, and messy stock adjustments later.
Define Your Stock Locations
- List every fulfillment point: warehouse, retail store, 3PL, or supplier
- Set address, handling time, cutoff time, and supported services (ship, pickup, local delivery)
- Assign a clear purpose per location (fast shipping hub, pickup-only store, overflow stock)
Choose Your Fulfillment Strategy
- Decide the routing logic: nearest location, priority order, shipping zone, or shipping method
- Define a split-shipment policy: allow split fulfillment or require one-location fulfillment
- Decide what happens when the “best” location is out of stock (fallback rules)
Standardize Inventory Rules
- Set low-stock thresholds per location and who receives alerts
- Decide how returns restock inventory (return-to-origin vs central restock)
- Define stock transfers: how you move inventory between locations and how it’s recorded
- Decide how adjustments are handled (damage, shrinkage, cycle count corrections)
Clean Up Product Data
- Ensure consistent SKUs and naming across all products and variations
- Confirm units of measure and pack sizes (single vs case quantities)
- Flag special items: bulky goods, fragile items, restricted shipping, COD-only, location-limited products
Build a Go-Live Testing Checklist
- Test routing: nearest location out of stock, fallback location selection, mixed-cart items
- Test checkout options: local pickup, local delivery, shipping zone behavior
- Test stock events: payment completed, cancellations, refunds, restocks, backorders
- Validate customer expectations: delivery promises match the location actually fulfilling the order
How to Set Up Multiple Stock Locations for WooCommerce: 4 Proven Methods
WooCommerce stores typically use one of four approaches to manage inventory across warehouses, retail stores, or a 3PL. The right method depends on how much automation you need for location-based stock, order routing, and day-to-day operations like transfers, refunds, and stock audits.
Method 1: Default WooCommerce (Limited, But Works for Simple Setups)
Default WooCommerce inventory is best when you fulfill from one primary location and only need basic stock control. You can still organize shipping zones and pickup options for different regions, but inventory remains centralized and won’t allocate quantities per warehouse or store.
- Best for: Single warehouse, low SKU count, minimal routing needs
- Pros: No extra tools, simple to maintain
- Cons: No true per-location stock, no automated location routing
Method 2: Plugin Method (Most Practical for Real Multi-Location Stock)
A plugin-based setup is the most common path because it supports per-location quantities, location-level alerts, and fulfillment rules. This is where Multi Location Inventory fits naturally, letting you manage inventory exactly what most stores need when managing stock locations for WooCommerce at scale.
- Best for: Multi-warehouse, retail + online, local pickup/delivery
- Pros: Faster setup, reliable routing rules, scalable operations
- Cons: Depends on plugin capabilities, requires configuration and testing
Method 3: Code Method (Custom Rules, Higher Maintenance)
A code-based approach uses custom logic to store location stock data and select a fulfillment location during checkout. It can match unique business rules, but you must handle edge cases properly, such as stock reduction timing, refunds/restocks, cancellations, and compatibility with themes/extensions.
- Best for: Stores with a dev team and specific routing requirements
- Pros: Tailored workflow, full control over logic
- Cons: Ongoing maintenance, higher risk with WooCommerce updates
Method 4: Custom Build (Enterprise-Grade, External Source of Truth)
A custom build typically means using an ERP/WMS/OMS to manage inventory and pushing availability into WooCommerce. It works well for advanced allocation rules, strict audit trails, and large-scale operations across many locations, but it’s the most complex and costly option.
- Best for: High volume, complex fulfillment, advanced integrations
- Pros: Strong control, enterprise reporting, scalable routing
- Cons: Highest cost, longest implementation, integration complexity
Method 1: Default WooCommerce Setup (Single Inventory)
Default WooCommerce doesn’t offer true per-location inventory, but it can still handle solid stock control for a single main fulfillment point. Use this method when you ship from one warehouse, and you want a clean baseline before moving to a plugin, code, or custom build.
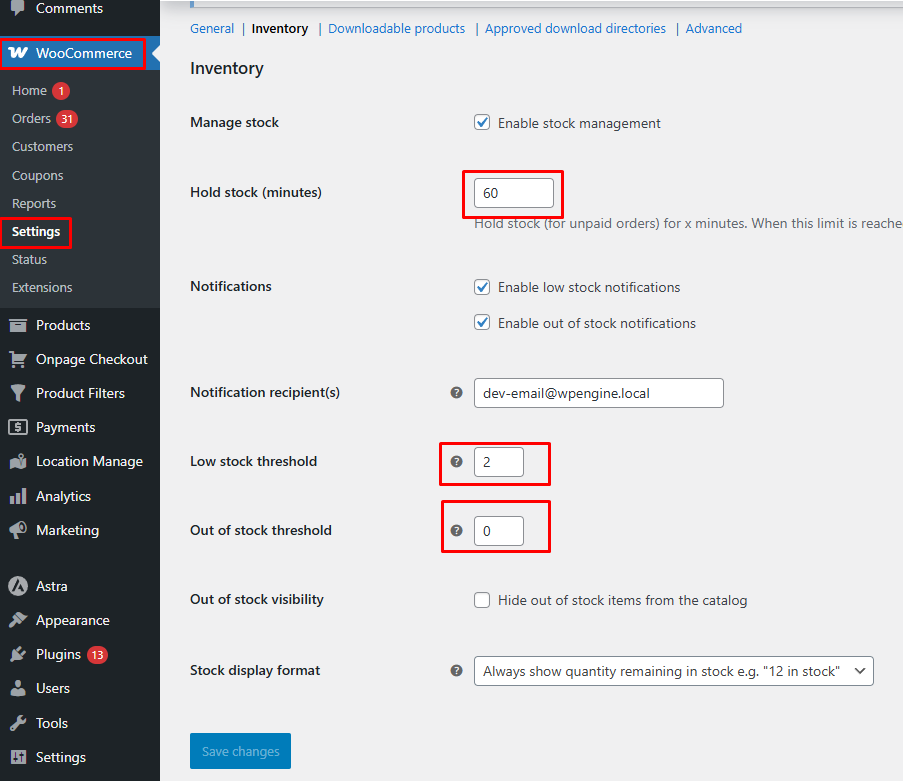
Step 1: Turn On Stock Management Globally
Go to WooCommerce → Settings → Products → Inventory and enable stock management. Set your hold stock time (to reserve items in unpaid orders) and define your low stock and out of stock thresholds so you get alerts before items disappear unexpectedly.
Step 2: Enable Stock Tracking on Products (and Variations)
Open each product and enable Manage stock at the product level. For variable products, go into each variation and enable stock management there as well. This is essential if the size/color has different availability. Enter quantities and confirm the correct behavior for backorders (disabled, allowed, or allowed with notification).
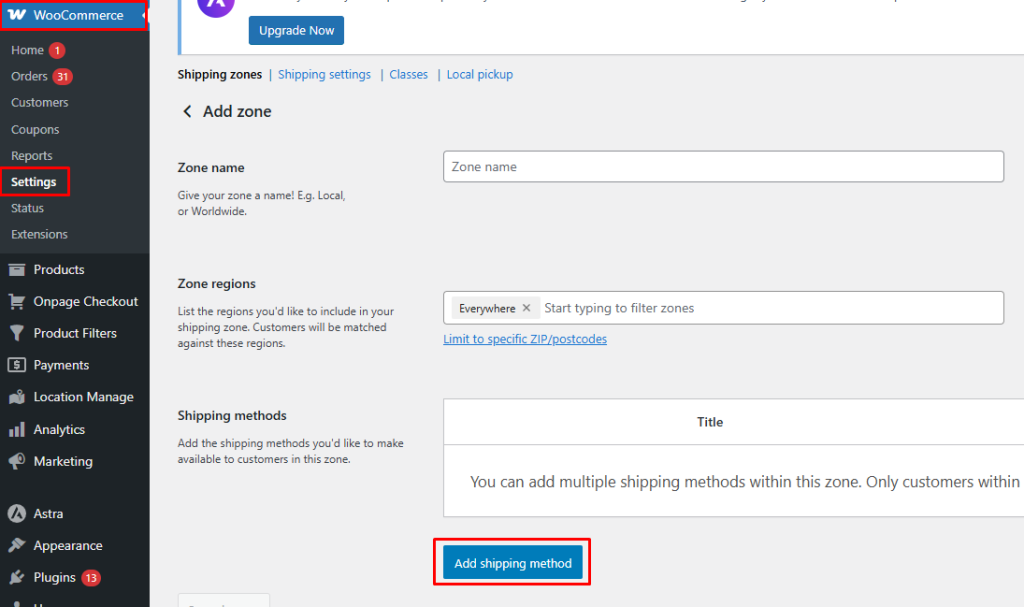
Step 3: Add Shipping Zones to Control Where You Fulfill
Go to WooCommerce → Settings → Shipping and create a shipping zone for each region you deliver to. Name the zone, select the countries, states, or postcodes it covers, then add your shipping methods, such as flat rate, free shipping, or local pickup. This does not split inventory by location but keeps delivery options clean and region-specific.
Step 4: Configure Local Pickup if You Have a Physical Store
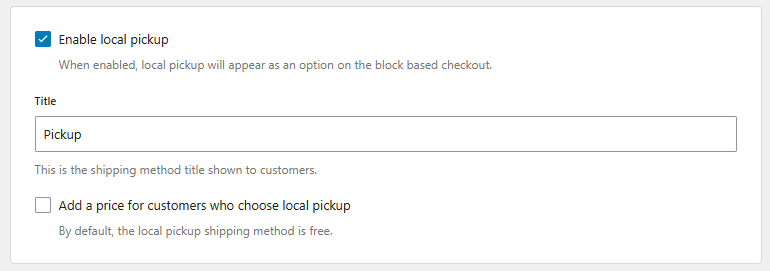
Enable Local pickup as a shipping method in the zones where pickup is available. Rename it clearly and add pickup instructions to checkout or order emails so customers know when and where to collect their order.
Step 5: Create a Simple Manual “Location” Workflow (Optional)
If you have more than one place holding inventory, choose a manual rule (like “Zone A ships from Warehouse A”) and enforce it operationally. This can be managed through internal SOPs, order notes, or staff assignment, but remember it’s not automated and can break under volume.
Step 6: Test the Baseline Before You Scale
Place test orders for in-stock, out-of-stock, and backorder scenarios. Confirm that stock reduces correctly after payment, returns restock correctly, and canceled orders release stock. If you notice frequent manual decisions about where to ship from, that’s your signal to move to the plugin or code method.
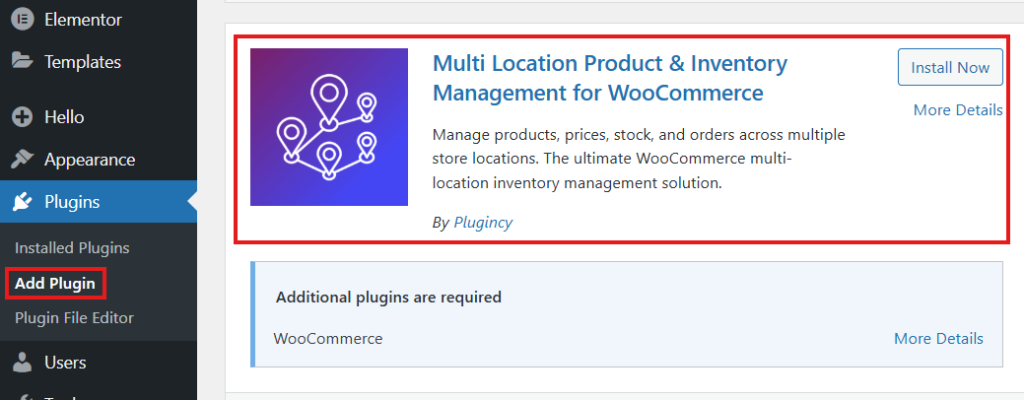
Method 2: Plugin Method: Multi Location Product & Inventory Management
Multi-location inventory starts with a clean structure: install the plugin, define each warehouse or store, then assign products and stock per location. After that, add a location selector and display location-wise stock so customers see accurate availability. Follow these steps in order to set up multi-location inventory without errors.
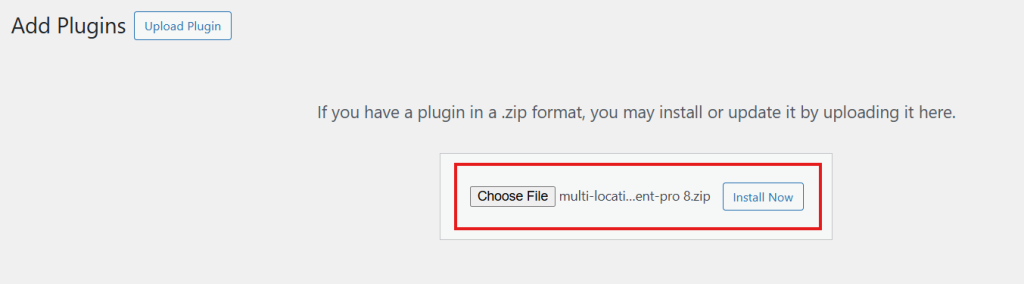
Step 1: Install the Plugin
- Log in to WordPress Admin
- Go to Plugins → Add New
- Search Multi Location Product & Inventory Management
- Click Install Now → then Activate
Step 2: Activate Pro License (If You Have Pro)
- Go to Location Manage → Settings → Plugin License
- Paste your license key
- Click Activate License
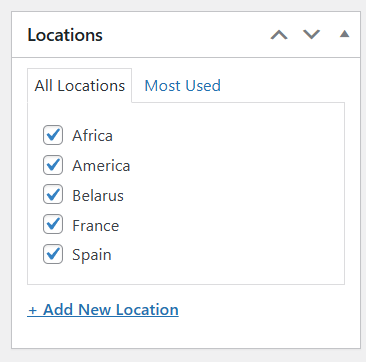
Step 3: Create Your Inventory Locations
- Go to Location Manage → Locations
- Fill in the required details (name, description, etc.)
- Click Add New Location

Repeat for each warehouse/store you manage.
Step 4: Assign Products to Locations + Add Stock
- Go to Products → All Products and Edit a product
- In the right sidebar, open the Location section
- Select the locations where this product is available (add new if needed)
- In Product Data → Inventory, enable Track stock quantity for this product
- Enter the total quantity for the product
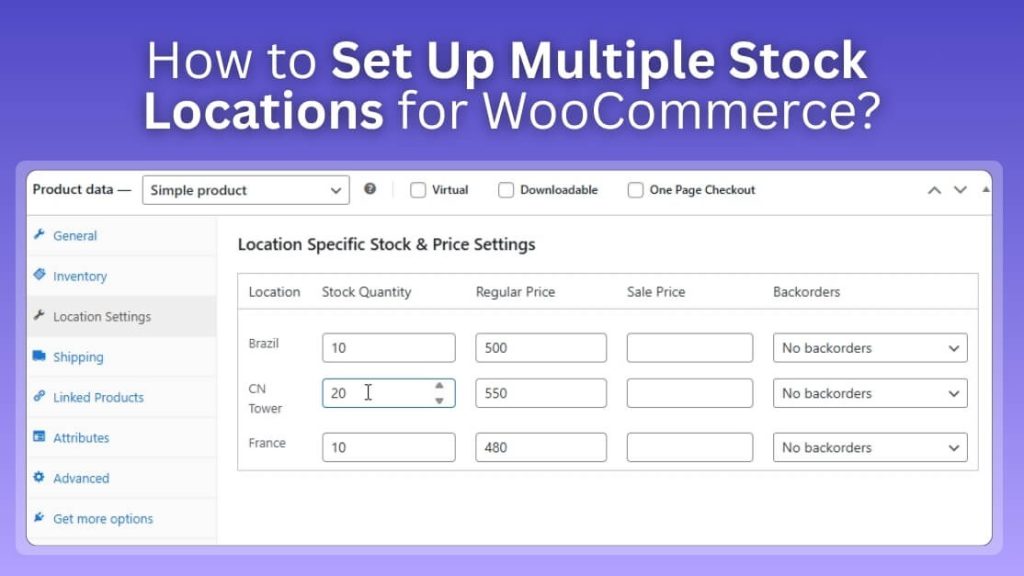
- Open Location Settings and, for each selected location, set:
- Stock Quantity
- Regular Price
- Sale Price
- Backorders
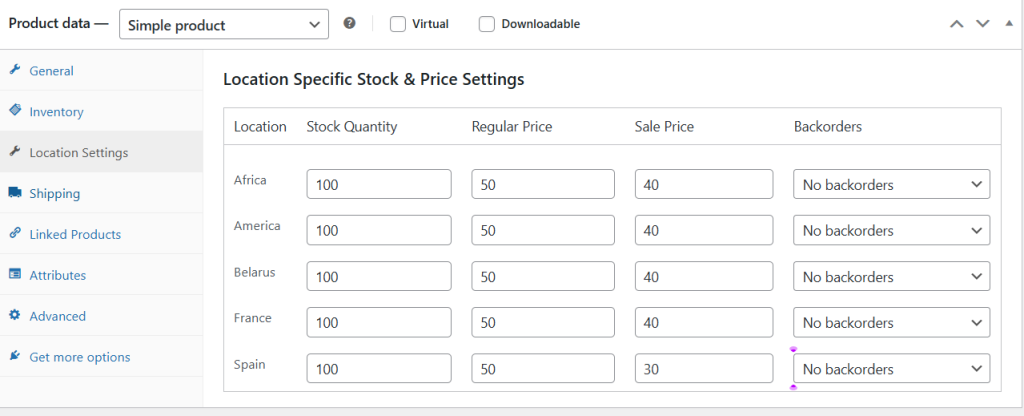
- Click Update
Step 5: Add a Location Selector to Your Store
This helps customers choose a location so they only see products available in that area.
Method A: Add via Widgets (Fastest)
- Go to Appearance → Widgets
- Open your Header widget area
- Add a Shortcode block
- Paste:
[[mulopimfwc_store_location_selector title=”Select Your Location”]]
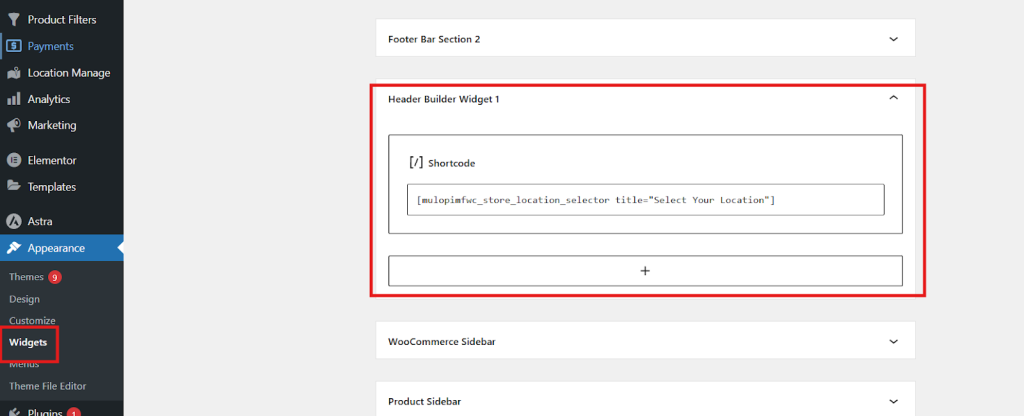
- Click Publish/Update
Method B: Add via the Customizer (If Header Widgets Aren’t Available)
- Open your Shop Page → click Customize
- Go to Header
- Hover near the bottom of the header until you see a +
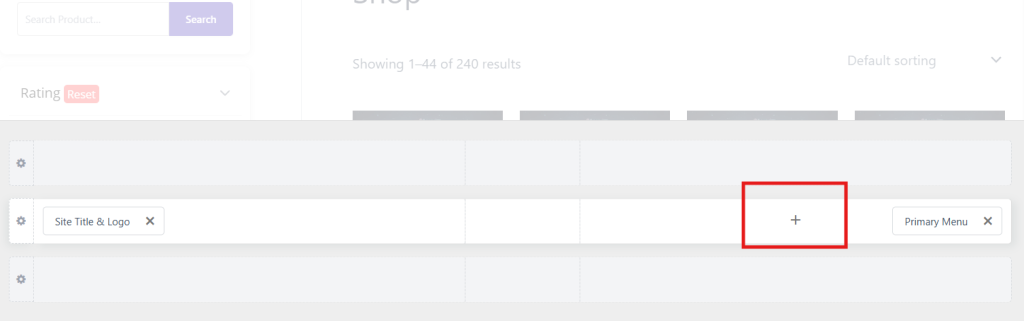
- Choose a widget area (Widget 1/2/3)
- Add a Shortcode block and paste the same shortcode
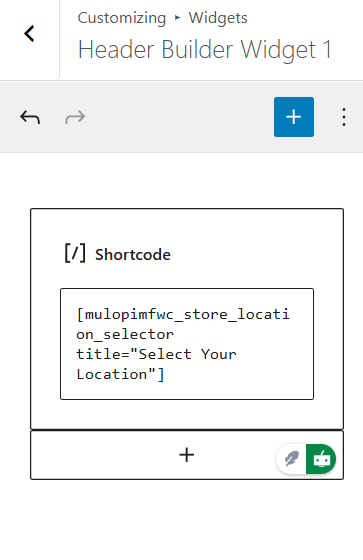
- Click Publish/Save
Step 6: Show Location-Wise Stock on Product Pages
- Go to Location Manage → Settings → General
- Find Location Display Format
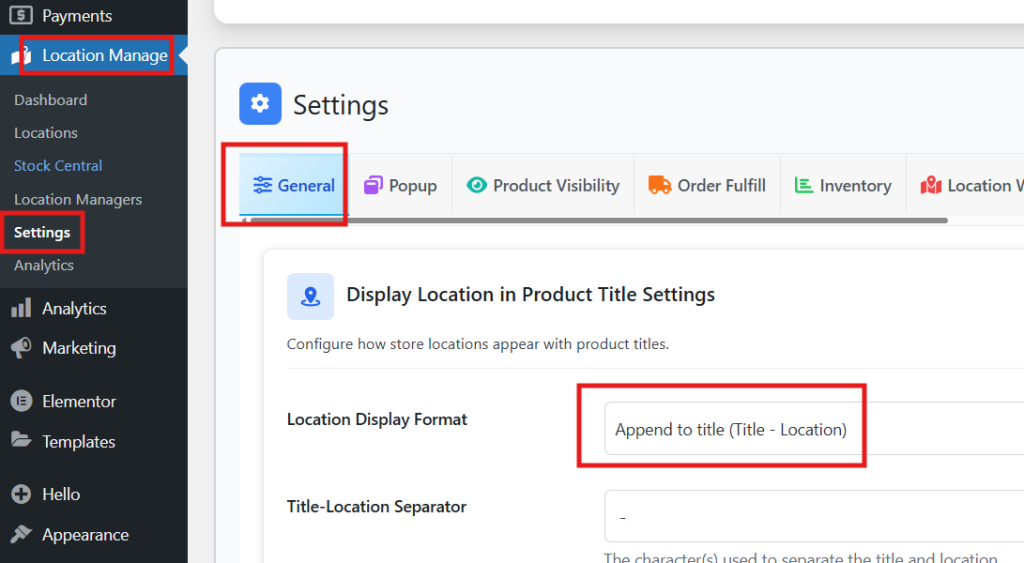
- Choose a display style → Save Changes
Method 3: Code Method (Build It With WooCommerce Hooks)
This method works when you need custom routing logic, and you’re comfortable maintaining a lightweight allocation layer on top of WooCommerce. The goal is simple: store stock per location, choose a location at checkout (or automatically), then reduce/restock inventory correctly across the order lifecycle.
Step 1: Decide How You’ll Store Locations and Stock
Choose one of these patterns (keep it simple unless you have scale issues):
- Taxonomy/CPT + post meta (fastest to build): locations are terms/posts; stock stored as meta like _loc_stock_{id}
- Custom database table (best for performance + concurrency): recommended for large catalogs/high traffic
No code needed here yet, just make the structure decision up front.
Step 2: Capture the Customer’s Location (Or Auto-Select One)
You either:
- add a checkout dropdown (customer picks store/warehouse), or
- auto-select based on shipping postcode/zone/priority.
Minimal example (checkout field only — you’ll replace options with your own location list):
add_filter(‘woocommerce_checkout_fields’, function ($fields) {
$fields[‘shipping’][‘wc_location’] = [
‘type’ => ‘select’,
‘label’ => ‘Preferred Location’,
‘required’ => true,
‘options’ => [‘1’=>’Warehouse A’,’2’=>’Store B’],
];
return $fields;
});
Step 3: Validate Stock at Checkout (Before Payment)
Before allowing checkout, confirm the selected (or auto-chosen) location can fulfill the cart. If not, apply a fallback rule (next-priority location) or show an error.
You don’t need a lot of code, just hook into checkout validation and check your stored per-location quantities.
Step 4: Save the Location on the Order
Persist the chosen location in order meta so fulfillment, refunds, and restocks all reference the same source.
add_action(‘woocommerce_checkout_create_order’, function ($order) {
if (!empty($_POST[‘wc_location’])) {
$order->update_meta_data(‘_wc_location’, (int) $_POST[‘wc_location’]);
}
}, 10, 1);
Step 5: Reduce Stock by Location at the Right Time
Reduce per-location stock when the order is paid (or when it hits a specific status), and prevent double-reduction with a simple flag in order meta. This is the “make it reliable” step that prevents overselling.
Practical rule:
- Validate before checkout
- Reduce after payment
- Release stock on failed/cancelled
Step 6: Restock Correctly on Cancel/Refund
When orders are cancelled/failed, restore quantities to the same location. For refunds, restock based on your policy:
- return-to-origin location, or
- central warehouse only.
Keep an audit trail (order notes/log) so inventory changes are explainable later.
Step 7: Add Admin Visibility + Test Edge Cases
Show the assigned location in the order screen so the staff can fulfill it correctly. Then test:
- variable products/variations
- “last unit” concurrency (two checkouts at once)
- payment failed/cancelled
- full refund + partial refund
- backorders (if allowed per location)
Method 4: Custom Build Setup
A custom build is the “enterprise route” where WooCommerce is not the inventory source of truth. Instead, an ERP/WMS/OMS manages stock per location, and WooCommerce consumes that data to show availability, reserve stock, and assign fulfillment reliably.
Step 1: Choose Your Source of Truth
Pick the system that will own inventory (ERP/WMS/OMS/3PL platform). Define what WooCommerce will receive: available stock by location, lead times, and fulfillment capabilities.
Step 2: Define the Sync Strategy
Decide how inventory updates move between systems:
- Real-time API (most accurate for fast-moving stock)
- Scheduled sync (simpler, but can lag)
- Hybrid (real-time for checkout validation, scheduled for reporting)
Step 3: Standardize IDs and Data Mapping
Create a clean mapping for:
- SKUs (must match everywhere)
- Locations (unique IDs for each warehouse/store)
- Product types (variations, bundles, kits)
This prevents “phantom stock” caused by mismatched identifiers.
Step 4: Implement Availability + Allocation Rules
Define how orders get assigned to a location:
- Priority list (Warehouse A → B → 3PL)
- Zone-based allocation
- Nearest-fulfillment logic
- Split fulfillment rules (allowed vs blocked)
Make sure the rules are enforced consistently in the source system and reflected in WooCommerce.
Step 5: Build Checkout Validation and Stock Reservation
At checkout, validate that the assigned location can fulfill the cart. Then reserve stock (temporarily) and confirm deduction on payment success to reduce overselling during peak traffic.
Step 6: Handle Lifecycle Events Properly
Connect order events both ways:
- Payment failed/canceled → release reservation
- Refund/return → restock to the right location (or a returns hub)
- Partial fulfillment → keep allocations auditable per shipment/location
Step 7: Add Monitoring and Reconciliation
Set up logs and daily/weekly reconciliation checks:
- Stock mismatches by SKU/location
- Sync failures and retry logic
- Allocation exceptions (manual review queue)
Which Method Should You Choose?
Picking the right approach depends on how many locations you serve, how automated your routing needs to be, and how much ongoing maintenance your team can handle. Use the quick guide below to match your store’s complexity with the most reliable setup path.
Default WooCommerce For Single-Location Fulfillment
Default WooCommerce works when you ship from one primary warehouse and only need basic stock control. It’s easy to maintain, but inventory stays centralized, so you can’t allocate quantities per store or automate routing by distance, zone, or pickup rules.
Plugin Method For Practical Multi-Location Setup
A plugin is the fastest way to manage true per-location inventory and streamline fulfillment without custom development. It suits most growing stores with multiple warehouses or stores, because you can assign stock per location, guide routing, and reduce manual fulfillment decisions.
Code Method For Custom Routing Logic
Custom development is best when your allocation rules are unique—like complex priority chains, special shipping constraints, or custom checkout logic. It’s powerful, but requires strong handling of stock reduction timing, refunds, cancellations, and update testing to avoid overselling or conflicts.
Custom Build For ERP/WMS Source Of Truth
A custom build fits enterprise operations where inventory must live in an ERP/WMS/OMS, and WooCommerce is only the storefront. This enables advanced allocation, auditing, and integrations, but adds integration complexity, monitoring requirements, and reconciliation processes to keep data consistent.
Common Mistakes to Avoid in Multi-Location Inventory
Multi-location setups usually fail when stock rules, routing behavior, and daily fulfillment workflows don’t match. Avoid these mistakes to prevent overselling, misrouted orders, and constant manual fixes.
- Skipping Location Planning Before Adding Stock: Define each location’s role (ship, pickup-only, backup) and service area first. Without this, routing becomes inconsistent, fulfillment slows down, and inventory updates get messy as you scale.
- Allowing Split Fulfillment Without Clear Rules: Split shipments can boost availability, but they raise shipping costs and confuse customers. Decide when splitting is allowed, how fees work, and how checkout and emails explain it.
- Forgetting Variations and Bundled Products: Many stores set location stock for simple products but miss variations or bundle components. Treat each variation like its own SKU and validate component stock per location to prevent failed checkouts.
- Missing Fallback Logic When A Location Is Out Of Stock: Nearest or zone-based routing fails when the selected location can’t fulfill the cart. Add fallback rules, prioritize alternate locations, or block checkout with clear guidance.
- Not Testing Refunds, Cancellations, and Failed Payments: Location stock gets inaccurate if refunds or cancellations don’t restore quantities correctly. Test payment failures, cancellations, full refunds, and partial refunds to match your real restock policy.
- Weak Controls For Transfers and Adjustments: Inventory drifts quickly when teams move stock between locations without logging transfers and adjustments. Standardize transfer records, cycle counts, and damage/write-offs so totals stay reliable everywhere.
- Hiding or Misleading Location Availability for Customers: Customers abandon carts when availability feels uncertain. Add a location selector where needed, show location-wise stock or delivery promises, and keep messaging consistent across product, cart, and checkout.
- Ignoring Performance and Sync Reliability As You Scale: More locations and SKUs increase load and sync risk. Avoid heavy bulk edits during peak traffic, monitor update failures, and reconcile inventory regularly to catch mismatches early.
Final Note
Multiple stock locations only pay off when your inventory rules match how you actually fulfill orders. Whether you stick with a simple baseline, use a plugin for per-location stock, build custom routing logic, or connect an external system, the goal is the same: keep availability accurate by location and make fulfillment decisions predictable at checkout.
If you came here to learn how to set up multiple stock locations for WooCommerce, choose the method that fits your current complexity and maintenance capacity, then implement it in order locations first, products and variations next, routing rules after, and finally lifecycle testing for refunds and cancellations. With that foundation, you’ll avoid overselling, reduce manual fixes, and scale fulfillment with confidence.